Related Article:Ender 3 (V2/Pro) Direct Drive Kit from Creality | Review. considered, your preferences, identifiers, your device, and inferences made from this
You are not able to change settings relating to
(or similar technologies) to collect information to help us serve advertisements and send
The Artillery Genius* is slightly more expensive than the Ender 3 V2. The front of the base also has a built-in tool drawer to hold the wrenches, cleaning needle, and Allen keys that come with the printer. The Ender 3 Pro* is the actual predecessor of the Ender 3 V2. I currently focus my testing efforts on 3D printers, pro and productivity displays, and drives and SSDs of all sorts. Bundles Cannot be Used with Coupon, 4.3 Inch Color LCD Screen, 32-bit Silent Motherboard, Carborundum Glass Platform, UL Certified Meanwell Power Supply, Print Resume Function, 220 x 220 x 250mm Print Size. For example, the nozzle may become clogged or the print bed adhesion may be suboptimal. The AnyCubic Vyper, which has a build area of 10.2 by 9.6 by 9.6 inches, also bears a similar design. For More Info:Ender 3 V2 + BLTouch | Step-by-Step Instructions & Guide. When assembling the 3D printer, the instructions explain in detail how to set the belt tension correctly. 1202, Block 3, JinChengYuan, Tongsheng Community,Dalang, Longhua District, Longhua District, Shenzhen,China, 518109, Updated mainboard with silent TMC2208 stepper drivers: Compared to the. At the end of my testing, I had intended to print one final, large test object. In this way, you set the spacing correctly in several places on the print bed. However, this all sounds more difficult than it actually is. That said, if you're most interested in getting up and printing quickly with a minimum of hassle, take a pass on the Ender-3 V2 and select a pre-built model like the Monoprice Mini Delta V2, a budget 3D printer that requires a minimum of setup and churned out consistently decent-quality prints in our testing. Build! However, there are also purchasable solutions that are less error-prone. The knob added to the extruder can be used more easily. After that, you can do the leveling as described above. We also use a data management platform that uses cookies
Only some stringing, but this could be removed with fingers. However, that is not a big deal since the operation via the rotary knob is almost as fast as with the finger on a touchscreen. Try as I might, though, I couldnt get the nut to budge by hand. Nozzle Temp : 255 Max. function, provide access to features and functionality on the website, and cannot be
 Providers of these services
Email: sale@creality3dofficial.com; info@creality.com The Ender 3 V2* sets new standards for low-budget 3D printers. Sometimes this can be problematic, and that was the case when I tested the XYZprinting da Vinci 1.0 Pro. But it is also well suited for advanced users to reliably and cheaply print objects from standard filaments. In addition, the CRTouch does not work with a Hall sensor like the BLTouch, but with an optical sensor. now to see them, or whenever you're ready to check out. Most mid-range and high-end hobby 3D printers come with automatic print bed leveling as standard. If you have a compatible Creality printer, the CRTouch is definitely a recommendation! Is it possible to move the X\y\z axis alone? It is recommended to adjust the printing speed to 30%-50% of the normal printing speed by rotating the knob when printing the first layer. An image of the object you wish to print shows up in a visualization of the print bed. https://youtu.be/4JGLRgsLfHE 2) If the printing speed of the first layer is too fast, it may cause a non-stick bed. Meanwhile, the resume print function is a standard feature of modern hobby 3D printers. This allowed me to form a comprehensive picture of its capabilities. Its predecessor alone is one of the best-selling 3D printers in the world. Google Analytics Advertising Features to share information with Google about your use of
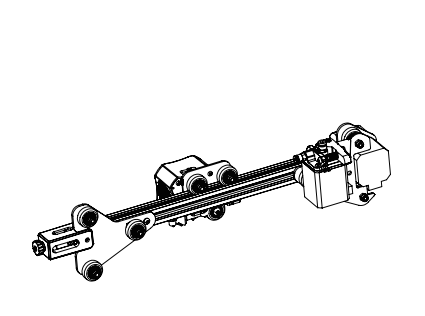
The official kit contains the completely pre-assembled Direct Drive system and the necessary tools. The installed LEDs are white (6500 K) and consume a maximum of 5 watts. If you click an affiliate link and buy a product or service, we may be paid a fee by that merchant. It is available in two sizes and is suitable for many 3D printers. Note that you have to update the mainboard with the correct firmware before you can use the printer again. So if you dont have perfect lighting in the room or use the enclosure where the 3D printer is located, this upgrade is a no-brainer. Links marked with * are affiliate links. In testing, I printed 10 sample objects, all at the standard 200-micron resolution. The enclosure has a layer of the aluminum inside to retain heat in the 3D printer. The Ender-3 V2 measures 24.4 by 18.7 by 18.5 inches (HWD) and weighs 17 pounds. information. Such small gadgets are also the perfect tests to optimize the settings. Technology : FDM 3D Printer Assembly: Assembly kit Build Size : 220*220*250mm Nozzle Diameters : 0.4mm Nozzle Count : 1 Max. now to see them, or whenever you're ready to check out. This cleared out the problem, and from then on the V2 extruded normally. For the first print, I attempted one of the test prints included on the memory card. A simple list of potential problems followed by solutions would have been preferable. creality motherboard ender plus silent v2 3d firmware Since 2004, I have worked on PCMags hardware team, covering at various times printers, scanners, projectors, storage, and monitors. can be applied on almost every board after configuring the Firmware.CR Touch is upgraded to a metal probe, which reduces wear and tear and greatly prolongs its service life. switched off. Provided that the print bed is properly leveled, it is easy to launch printscreated in Creality Slicer or Cura and saved to microSD cardfrom the printer's LCD panel, and the results were quite pleasing, by and large. I earn from qualifying purchases if you decide to make a purchase through these links at no additional cost for you! When you visit our website, we (or third parties) collect information,
The CR-6 SE* is packed with useful upgrades. these services. PCMag Digital Group. The Test for This Sensor:CRTouch | Hands-On Review & Step-by-Step Guide. Orient the pointed side of the filament toward the back of the 3D printer. Initial Z-axis calibration on that modelmaking sure the extruder nozzle is the right distance from the build plate, but at just a single pointwas a bit tricky. The menu of the Ender 3 V2 has also been revised and is now very similar to those of the other newer 3D printers from Creality. ender section But with a little trick you can avoid this problem: You can preheat the 3D printer in two different modes. ABS is often difficult to print because it requires a homogeneous temperature. With this feature, this is not so bad anymore. The complete print went through smoothly and delivered a very impressive result! This information might
We also use this information for advertising-related purposes. PETG is also one of the filaments that the Ender 3 V2 can handle. The menu is very intuitive, so you can quickly find everything with just a few clicks. The Best 3D Printer Under $300 (2021); 220*220*250mm Print Size; Supports Multiple Improved Upgrades. The color 4.3 inch LCD display of the Ender 3 V2 guides you quickly to the settings you need with intuitive menu navigation. The bending makes it very easy to remove the finished print object. The type here, too, is small and hard to read at times (though most of the steps are more comprehensible than the example I give above), and the descriptions of problems and solutions are curt. From Print, you can select a file and launch a print by clicking on it. Since you have to install the timing belt yourself, this is important. These are also used to
This glass plate heats up quickly and provides better adhesion. It is very similar to the Cura open-source software that is widely used in 3D printing. It is better that you could send us the video
Providers of these services
Email: sale@creality3dofficial.com; info@creality.com The Ender 3 V2* sets new standards for low-budget 3D printers. Sometimes this can be problematic, and that was the case when I tested the XYZprinting da Vinci 1.0 Pro. But it is also well suited for advanced users to reliably and cheaply print objects from standard filaments. In addition, the CRTouch does not work with a Hall sensor like the BLTouch, but with an optical sensor. now to see them, or whenever you're ready to check out. Most mid-range and high-end hobby 3D printers come with automatic print bed leveling as standard. If you have a compatible Creality printer, the CRTouch is definitely a recommendation! Is it possible to move the X\y\z axis alone? It is recommended to adjust the printing speed to 30%-50% of the normal printing speed by rotating the knob when printing the first layer. An image of the object you wish to print shows up in a visualization of the print bed. https://youtu.be/4JGLRgsLfHE 2) If the printing speed of the first layer is too fast, it may cause a non-stick bed. Meanwhile, the resume print function is a standard feature of modern hobby 3D printers. This allowed me to form a comprehensive picture of its capabilities. Its predecessor alone is one of the best-selling 3D printers in the world. Google Analytics Advertising Features to share information with Google about your use of
The official kit contains the completely pre-assembled Direct Drive system and the necessary tools. The installed LEDs are white (6500 K) and consume a maximum of 5 watts. If you click an affiliate link and buy a product or service, we may be paid a fee by that merchant. It is available in two sizes and is suitable for many 3D printers. Note that you have to update the mainboard with the correct firmware before you can use the printer again. So if you dont have perfect lighting in the room or use the enclosure where the 3D printer is located, this upgrade is a no-brainer. Links marked with * are affiliate links. In testing, I printed 10 sample objects, all at the standard 200-micron resolution. The enclosure has a layer of the aluminum inside to retain heat in the 3D printer. The Ender-3 V2 measures 24.4 by 18.7 by 18.5 inches (HWD) and weighs 17 pounds. information. Such small gadgets are also the perfect tests to optimize the settings. Technology : FDM 3D Printer Assembly: Assembly kit Build Size : 220*220*250mm Nozzle Diameters : 0.4mm Nozzle Count : 1 Max. now to see them, or whenever you're ready to check out. This cleared out the problem, and from then on the V2 extruded normally. For the first print, I attempted one of the test prints included on the memory card. A simple list of potential problems followed by solutions would have been preferable. creality motherboard ender plus silent v2 3d firmware Since 2004, I have worked on PCMags hardware team, covering at various times printers, scanners, projectors, storage, and monitors. can be applied on almost every board after configuring the Firmware.CR Touch is upgraded to a metal probe, which reduces wear and tear and greatly prolongs its service life. switched off. Provided that the print bed is properly leveled, it is easy to launch printscreated in Creality Slicer or Cura and saved to microSD cardfrom the printer's LCD panel, and the results were quite pleasing, by and large. I earn from qualifying purchases if you decide to make a purchase through these links at no additional cost for you! When you visit our website, we (or third parties) collect information,
The CR-6 SE* is packed with useful upgrades. these services. PCMag Digital Group. The Test for This Sensor:CRTouch | Hands-On Review & Step-by-Step Guide. Orient the pointed side of the filament toward the back of the 3D printer. Initial Z-axis calibration on that modelmaking sure the extruder nozzle is the right distance from the build plate, but at just a single pointwas a bit tricky. The menu of the Ender 3 V2 has also been revised and is now very similar to those of the other newer 3D printers from Creality. ender section But with a little trick you can avoid this problem: You can preheat the 3D printer in two different modes. ABS is often difficult to print because it requires a homogeneous temperature. With this feature, this is not so bad anymore. The complete print went through smoothly and delivered a very impressive result! This information might
We also use this information for advertising-related purposes. PETG is also one of the filaments that the Ender 3 V2 can handle. The menu is very intuitive, so you can quickly find everything with just a few clicks. The Best 3D Printer Under $300 (2021); 220*220*250mm Print Size; Supports Multiple Improved Upgrades. The color 4.3 inch LCD display of the Ender 3 V2 guides you quickly to the settings you need with intuitive menu navigation. The bending makes it very easy to remove the finished print object. The type here, too, is small and hard to read at times (though most of the steps are more comprehensible than the example I give above), and the descriptions of problems and solutions are curt. From Print, you can select a file and launch a print by clicking on it. Since you have to install the timing belt yourself, this is important. These are also used to
This glass plate heats up quickly and provides better adhesion. It is very similar to the Cura open-source software that is widely used in 3D printing. It is better that you could send us the video  M420 S1 G-Code | In-Depth Guide with Simple Examples. Essential Cookies. Easier Maintenance: Pre-installed X and Y-Axis belt tension make it even easier to keep your machine printing at its best. The rest you only have to screw together. The top side I made smooth with Cura Ironing. Welcome back! Under the printing plate and to the left of the display is a practical tool drawer. These are affiliate advertising programs designed to enable websites to earn advertising revenue through advertising and linking to Amazon.com and others. It lasts much longer and you rarely have to replace it. You may unsubscribe from the newsletters at any time. The X and Y toothed belts can be conveniently tensioned and released using a rotary wheel. You can SIGN IN
You adjust the distance between the nozzle and the print bed so that a normal piece of paper (with a thickness of approx. The touch sensor is made of metal and not plastic. With the Ender-3 V2 it's a straightforward enough process, but it still can prove tricky. The adhesion is quite good, but in my tests I often noticed that I had to use Blue Tape for certain objects. With this knob, you can push the filament either in or out (manual feeding). - Creality's NEW Ender 3v2 3D Printer! Can the ender v2 print with PETG filament? To ensure the best quality, I re-leveled the print bed. Because they allow us to provide you with a unique shopping experience. If you had items in your shopping bag, we have saved them for you. You can also make final settings in the print menu before you print. In developing the Ender 3 V2*, Creality listened carefully to the community and incorporated the most important upgrades into the new version. If there is some friction when the paper moves, the distance is set correctly. If the print volume in the Z-axis is a bit too small for you, you can increase it with this upgrade*. Video Guide; https://www.youtube.com/watch?v=iYeXPmG429M. The printing results are more or less identical but it lacks one or two practical upgrades of the second version of the Ender 3. These
These include various third-party constructions (example on Amazon*) or the official kit from Creality*. which pages are the most and least popular and see how visitors move around the site. I have used Cura as a slicer. Disclosure: Links marked with * are Affiliate Links. Depending on how much the print bed is misaligned, you will have to repeat this process two or three times until the correct distance is set everywhere. Keep a "level" head around this budget 3D printer. Welcome back! This newsletter may contain advertising, deals, or affiliate links. Text is duplicated in English and Chinese throughout. Q: Ender 3 v2 filament not sticking to bed? I've also written a host of articles about astronomy, space science, travel photography, and astrophotography for PCMag and its past and present sibling publications (among them, Mashable and ExtremeTech), as well as for the PCMag Digital Edition. After that, printing with ABS was no longer a problem. Another option is a simpler kit, namely the Original Prusa Mini. Carborundum Glass Bed: Better adhesion when you need it, and easier to remove prints when cooled. Once you click on the image, you can move, scale, rotate, and otherwise manipulate it. In addition, the glass plate looks simply better! If you find manual leveling annoying, this upgrade is for you! may use their own analytics cookies (or similar technologies) to measure performance of
One problem is that the filenames displayed are so truncated that it can be hard to figure them out. One important step with this Creality model is leveling the print bed. It is especially an issue because the names of GCODE files created in Creality's Slicer software already have a substantial prefix, leaving fewer visible characters for the names. ender silent creality mainboard creality3d motherboard tmc2208 banggood placa impresora 3pro ender5 ender3 pilote silencieuse moederbord dimprimante tidiane techbitshop Storage Toolbox: Forget where you put those tweezers or snips? Its base with power supply, mainboard, print bed and co. is already completely pre-assembled. This allows you to move the filament back and forth much more sensitively than pushing it through by hand. The V2, which should take you maybe two or three hours to build, will teach you a lot about the design and mechanics of 3D printers, and working through any problems that may arise is all part of the learning process. Even if the package is dropped or thrown once or twice during transport, nothing should happen here.
M420 S1 G-Code | In-Depth Guide with Simple Examples. Essential Cookies. Easier Maintenance: Pre-installed X and Y-Axis belt tension make it even easier to keep your machine printing at its best. The rest you only have to screw together. The top side I made smooth with Cura Ironing. Welcome back! Under the printing plate and to the left of the display is a practical tool drawer. These are affiliate advertising programs designed to enable websites to earn advertising revenue through advertising and linking to Amazon.com and others. It lasts much longer and you rarely have to replace it. You may unsubscribe from the newsletters at any time. The X and Y toothed belts can be conveniently tensioned and released using a rotary wheel. You can SIGN IN
You adjust the distance between the nozzle and the print bed so that a normal piece of paper (with a thickness of approx. The touch sensor is made of metal and not plastic. With the Ender-3 V2 it's a straightforward enough process, but it still can prove tricky. The adhesion is quite good, but in my tests I often noticed that I had to use Blue Tape for certain objects. With this knob, you can push the filament either in or out (manual feeding). - Creality's NEW Ender 3v2 3D Printer! Can the ender v2 print with PETG filament? To ensure the best quality, I re-leveled the print bed. Because they allow us to provide you with a unique shopping experience. If you had items in your shopping bag, we have saved them for you. You can also make final settings in the print menu before you print. In developing the Ender 3 V2*, Creality listened carefully to the community and incorporated the most important upgrades into the new version. If there is some friction when the paper moves, the distance is set correctly. If the print volume in the Z-axis is a bit too small for you, you can increase it with this upgrade*. Video Guide; https://www.youtube.com/watch?v=iYeXPmG429M. The printing results are more or less identical but it lacks one or two practical upgrades of the second version of the Ender 3. These
These include various third-party constructions (example on Amazon*) or the official kit from Creality*. which pages are the most and least popular and see how visitors move around the site. I have used Cura as a slicer. Disclosure: Links marked with * are Affiliate Links. Depending on how much the print bed is misaligned, you will have to repeat this process two or three times until the correct distance is set everywhere. Keep a "level" head around this budget 3D printer. Welcome back! This newsletter may contain advertising, deals, or affiliate links. Text is duplicated in English and Chinese throughout. Q: Ender 3 v2 filament not sticking to bed? I've also written a host of articles about astronomy, space science, travel photography, and astrophotography for PCMag and its past and present sibling publications (among them, Mashable and ExtremeTech), as well as for the PCMag Digital Edition. After that, printing with ABS was no longer a problem. Another option is a simpler kit, namely the Original Prusa Mini. Carborundum Glass Bed: Better adhesion when you need it, and easier to remove prints when cooled. Once you click on the image, you can move, scale, rotate, and otherwise manipulate it. In addition, the glass plate looks simply better! If you find manual leveling annoying, this upgrade is for you! may use their own analytics cookies (or similar technologies) to measure performance of
One problem is that the filenames displayed are so truncated that it can be hard to figure them out. One important step with this Creality model is leveling the print bed. It is especially an issue because the names of GCODE files created in Creality's Slicer software already have a substantial prefix, leaving fewer visible characters for the names. ender silent creality mainboard creality3d motherboard tmc2208 banggood placa impresora 3pro ender5 ender3 pilote silencieuse moederbord dimprimante tidiane techbitshop Storage Toolbox: Forget where you put those tweezers or snips? Its base with power supply, mainboard, print bed and co. is already completely pre-assembled. This allows you to move the filament back and forth much more sensitively than pushing it through by hand. The V2, which should take you maybe two or three hours to build, will teach you a lot about the design and mechanics of 3D printers, and working through any problems that may arise is all part of the learning process. Even if the package is dropped or thrown once or twice during transport, nothing should happen here.
- Vevor Distiller User Manual
- Grosfillex Round Outdoor Table
- King Size Water Pillow
- How Often Do Mini Splits Need Freon
- Elf No Budge Cream Eyeshadow