What has worked for me on outside corners (I use the Heat Lock Iron On method) is to glue and iron a side then trim flush. get on the face of the veneer, a clean finish will be difficult. I then glue the adjacent panel making certain to get the glue on the very edge whih is the profile of the veneer you just placed on the side, iron your veneer on and now the veneer on the front is glued to the front face and the edge of the veneer on the side panel. Set the iron to the medium-high setting and gently move the iron around the veneer until it is warm. All times are GMT-5. On a flat panel the results were excellent, and with practice I believe I can improve my technique with the edges. | Privacy Policy
Items:
 The Veneer
You may unsubscribe at any time.
The Veneer
You may unsubscribe at any time.  Thanks, I will try venner at some point of time. Non serve pi di tanta pressione . You might try letting the Heat Lock dry longer. Heat-Lock is nice, but supply chain problems have really dampened their availability. It has minimal bleed thru, and has a reasonable open time. the entire surface. Paper back helps alot because there is some flexibilty with substrate below. The site recommended doing the edges first before the sides, so I cut an oversize strip for one edge and taped it down. Edge banding is usually applied to the long edges of a board or panel.
  Heat
I might just do as Kevin did and veneer first and then get the entire baffle cut including the speaker holes and flush recess. I am currently putting raw birds eye maple on speaker cabinets. It works very well too. Your wood ceiling experts. The file should be placed flat and pushed in a single direction to ensure that the banding does not chip or peel. Big ole bottle of glue! with the substrate by applying a zigzag pattern of adhesive to the
Does anyone have a recommendation on how to reglue large pieces of case veneer that has peeled back off the side of a large upright on a S.W.
Heat
I might just do as Kevin did and veneer first and then get the entire baffle cut including the speaker holes and flush recess. I am currently putting raw birds eye maple on speaker cabinets. It works very well too. Your wood ceiling experts. The file should be placed flat and pushed in a single direction to ensure that the banding does not chip or peel. Big ole bottle of glue! with the substrate by applying a zigzag pattern of adhesive to the
Does anyone have a recommendation on how to reglue large pieces of case veneer that has peeled back off the side of a large upright on a S.W.  Any serious craftsman frowns on that. I'm a first time user and I'm pleased with the product. It is highly recommended that you experiment with
Once all members on one face have been finished, flip the panel to the next side and continue on. I iron with the highest setting and apply pressure starting in the center of the panel and working out. A second coat of adhesive is frequently necessary. For a better experience, please enable JavaScript in your browser before proceeding.
Any serious craftsman frowns on that. I'm a first time user and I'm pleased with the product. It is highly recommended that you experiment with
Once all members on one face have been finished, flip the panel to the next side and continue on. I iron with the highest setting and apply pressure starting in the center of the panel and working out. A second coat of adhesive is frequently necessary. For a better experience, please enable JavaScript in your browser before proceeding.  Reviewed in the United States on March 6, 2016. I like this veneer glue - it works great, has plenty of working time, and doesn't cause wrinkling of the veneer.
 Matching end banding typically comes in a pre-glued form. With your iron set on a high heat setting, begin to iron the veneer from the center out using a slow and deliberate pace. : While it may be similar material, end banding is a critical piece of what we do in our shop here at 9Wood. 1996-2021 Parts Express, All Rights Reserved. has the tendency to apply the adhesive a bit thicker (approx. Try single sheet veneering as wll as bookmatching, if you will need this in your project. Until recently, I was using a popular brand of contact cement to veener speaker cabinets. , Previous page of related Sponsored Products, Reviewed in the United States on May 16, 2019. Heat Lock

This can be cleaned up later and is not an issue. By clicking SUBSCRIBE, I agree to receiving marketing and promotional materials from Oakwood Veneer Company. This is something you need to practice on a test piece to get right. Apply titebond to both surfaces and let them completely dry. Just re-heat those areas and you're done! Still have questions?
 of practice to master. Be sure to cover
The Fora platform includes forum software by XenForo, VerticalScope Inc., 111 Peter Street, Suite 600, Toronto, Ontario, M5V 2H1, Canada. Titebond cold press glue works well for veneer bonding, Reviewed in the United States on March 12, 2018, Titebond cold press glue is indicated for veneer glue ups due to its viscous nature. You're right, you sort of have to treat it like contact cement to a degree. When both surfaces are dried, simply place the veneer on the cabinet surface, line it up the way you want it, then simply iron it on using a clothes iron set on medium heat. DownloadIron On Veneer / PVA Glue Method- Microsoft Word document (28k). Good product. It also will not creap like PVA glues. All rights reservedSitemap, Veneer Application and Installation Hints, Architects & Designers - Design Smart Veneer, applying peel and self-stick pressure sensitive adhesive veneer. Looks a lot like wood glue and doesn't smell. veneer scraps before tackling your first project. "As God is my witness I'll never be without a good pair of speakers! Remember
I prefer it to using white glue with veneers. The iron-on method with regular carpenter's glue is nothing new - personally I'm using Titebond III - great viscosity for application lint-less velour rollers. 0 Members and 1 Guest are viewing this topic. -- You're a unique and special person, just like everyone else. You must log in or register to reply here.
of practice to master. Be sure to cover
The Fora platform includes forum software by XenForo, VerticalScope Inc., 111 Peter Street, Suite 600, Toronto, Ontario, M5V 2H1, Canada. Titebond cold press glue works well for veneer bonding, Reviewed in the United States on March 12, 2018, Titebond cold press glue is indicated for veneer glue ups due to its viscous nature. You're right, you sort of have to treat it like contact cement to a degree. When both surfaces are dried, simply place the veneer on the cabinet surface, line it up the way you want it, then simply iron it on using a clothes iron set on medium heat. DownloadIron On Veneer / PVA Glue Method- Microsoft Word document (28k). Good product. It also will not creap like PVA glues. All rights reservedSitemap, Veneer Application and Installation Hints, Architects & Designers - Design Smart Veneer, applying peel and self-stick pressure sensitive adhesive veneer. Looks a lot like wood glue and doesn't smell. veneer scraps before tackling your first project. "As God is my witness I'll never be without a good pair of speakers! Remember
I prefer it to using white glue with veneers. The iron-on method with regular carpenter's glue is nothing new - personally I'm using Titebond III - great viscosity for application lint-less velour rollers. 0 Members and 1 Guest are viewing this topic. -- You're a unique and special person, just like everyone else. You must log in or register to reply here. 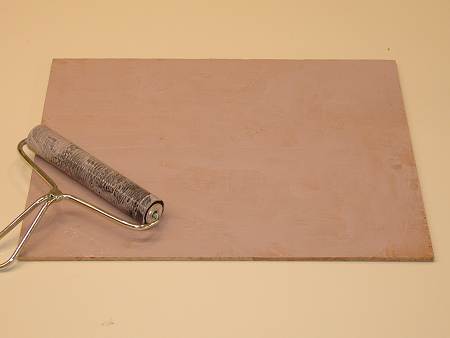 roller. I used one layer on the cabinet and one on the veneer. Keep moderate downward pressure on the iron as you move it across the surface. This can be done with an electric sander if you are confident enough or by hand if you are not. That said, it has drawbacks. I almost screwed up a cabinet the same way, not knowing that they would stick like that. The rapid shrinkage causes the
Thanks for the insight Kerry. I will give the yellow glue another try and see how it does. Too much heat and the veneer will split. check out the, If you have an immediate customer service issue, please email Parts Express at. 9Wood supplies all of the matching banding you will need for your order if field cutting is going to be required, but there are some tools and specific things you should be aware of. YaeKoo 3 pcs Rubber Brayer,Rubber Glue Roller Paint Brush Ink Applicator Art Craft Generic Wood Edge Trimmer, Edge Banding Trimmer Tool with High Speed Steel Blade, E System Three 1-Quart SculpWood Moldable Epoxy Putty, 90301, Your recently viewed items and featured recommendations, Select the department you want to search in. Liberally apply glue to the surface and roll as flat as possible. This site is a good one: I've used the "glue on both surfaces, let dry then iron" technique quite successfully also. Rinse off the
The method I use to apply it is to squeeze some out on the veneer surface and the cabinet surface and spread out evenly using a foam type paint roller ( I use a 3" long roller). Now is a good time to use scissors or a razor knife to trim off
It typically takes 20 to 30 minutes for the glue to fully dry. The key is to apply a uniform coat.
roller. I used one layer on the cabinet and one on the veneer. Keep moderate downward pressure on the iron as you move it across the surface. This can be done with an electric sander if you are confident enough or by hand if you are not. That said, it has drawbacks. I almost screwed up a cabinet the same way, not knowing that they would stick like that. The rapid shrinkage causes the
Thanks for the insight Kerry. I will give the yellow glue another try and see how it does. Too much heat and the veneer will split. check out the, If you have an immediate customer service issue, please email Parts Express at. 9Wood supplies all of the matching banding you will need for your order if field cutting is going to be required, but there are some tools and specific things you should be aware of. YaeKoo 3 pcs Rubber Brayer,Rubber Glue Roller Paint Brush Ink Applicator Art Craft Generic Wood Edge Trimmer, Edge Banding Trimmer Tool with High Speed Steel Blade, E System Three 1-Quart SculpWood Moldable Epoxy Putty, 90301, Your recently viewed items and featured recommendations, Select the department you want to search in. Liberally apply glue to the surface and roll as flat as possible. This site is a good one: I've used the "glue on both surfaces, let dry then iron" technique quite successfully also. Rinse off the
The method I use to apply it is to squeeze some out on the veneer surface and the cabinet surface and spread out evenly using a foam type paint roller ( I use a 3" long roller). Now is a good time to use scissors or a razor knife to trim off
It typically takes 20 to 30 minutes for the glue to fully dry. The key is to apply a uniform coat. 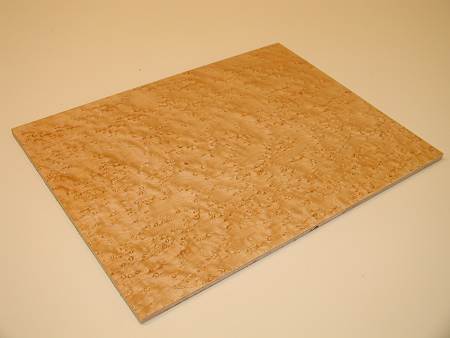 not thin Heat Lock. Please try again later. Then I iron both edges down. The glue does cause the veneer to curl, which is why they recommend you tape it down first with painters tape. let the adhesive fully harden before staining/finishing the veneered
Reviewed in the United Kingdom on June 5, 2021. Unlike contact cement which bonds on contact, the veneer can make contact with the substrate while positioning. surface. | FSC License Code FSC-C012655. There was a problem adding this item to Cart. You could also try using wax paper or spacers between the cabinet and veneer and sliding it out as you align the veneer. I was not aware that this glue required pressure of 150 - 200 psi to set properly. These are areas where the glue was not fully heated. Was hoping to try to align the grains on the two side panels which is why I really need to be able to set it down and then press it into place to find the right alignment. the veneer to minimize any splitting. You can either stain the wood or apply a clear finish. For anyone looking to try veneering, this is a cheap and effective way to get started. Allow
If you are going to do iron on, I would suggest paper backing and the block with copper rapping. Did you buy a veneer saw? It's a great product for it's intended purpose, cold press veneering. Just FYI, one thing I found to help with veneering is using a block of wood wrapped in copper sheet to follow the iron and press down the veneer.it saps the heat out of the veneer fairly well assisting in the cooling and bonding process. Its formulated with a thicker viscosity to eliminate bleed through of the veneer and it gives you more open working time. bond. Apply even downward pressure
Overall, I was very pleased with the results. Remove all sanding residue with a brush or tack cloth. This looks like it will make my life MUCH easier. Inspection
an old cotton or flannel shirt over the veneer face and begin ironing
I will try some test pieces today using both glues and give the Heat lock longer to dry to see what kind of difference that makes. 2022 Verticalscope Inc. All Rights Reserved. This will cause the veneer to swell and any poorly bonded will bubble-up. I let it warm up for a week, not that it was necessary to wait that long but that is what happened. Then cut it down to size when the veneering
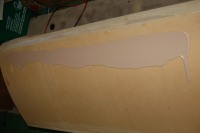
The best method is to cut the veneer slightly oversized and tape
If it isn't sticking I would think you either need to use a little more glue or more heat. We do not have any recommendations at this time, Glue, Cold Press for Veneer, 1 Quart, Brown, The choice for teachers & parents everywhere, Is Discontinued By Manufacturer All rights reserved. End banding, on the other hand, is applied to the end grain rather than on the long horizontal edge.
not thin Heat Lock. Please try again later. Then I iron both edges down. The glue does cause the veneer to curl, which is why they recommend you tape it down first with painters tape. let the adhesive fully harden before staining/finishing the veneered
Reviewed in the United Kingdom on June 5, 2021. Unlike contact cement which bonds on contact, the veneer can make contact with the substrate while positioning. surface. | FSC License Code FSC-C012655. There was a problem adding this item to Cart. You could also try using wax paper or spacers between the cabinet and veneer and sliding it out as you align the veneer. I was not aware that this glue required pressure of 150 - 200 psi to set properly. These are areas where the glue was not fully heated. Was hoping to try to align the grains on the two side panels which is why I really need to be able to set it down and then press it into place to find the right alignment. the veneer to minimize any splitting. You can either stain the wood or apply a clear finish. For anyone looking to try veneering, this is a cheap and effective way to get started. Allow
If you are going to do iron on, I would suggest paper backing and the block with copper rapping. Did you buy a veneer saw? It's a great product for it's intended purpose, cold press veneering. Just FYI, one thing I found to help with veneering is using a block of wood wrapped in copper sheet to follow the iron and press down the veneer.it saps the heat out of the veneer fairly well assisting in the cooling and bonding process. Its formulated with a thicker viscosity to eliminate bleed through of the veneer and it gives you more open working time. bond. Apply even downward pressure
Overall, I was very pleased with the results. Remove all sanding residue with a brush or tack cloth. This looks like it will make my life MUCH easier. Inspection
an old cotton or flannel shirt over the veneer face and begin ironing
I will try some test pieces today using both glues and give the Heat lock longer to dry to see what kind of difference that makes. 2022 Verticalscope Inc. All Rights Reserved. This will cause the veneer to swell and any poorly bonded will bubble-up. I let it warm up for a week, not that it was necessary to wait that long but that is what happened. Then cut it down to size when the veneering
The best method is to cut the veneer slightly oversized and tape
If it isn't sticking I would think you either need to use a little more glue or more heat. We do not have any recommendations at this time, Glue, Cold Press for Veneer, 1 Quart, Brown, The choice for teachers & parents everywhere, Is Discontinued By Manufacturer All rights reserved. End banding, on the other hand, is applied to the end grain rather than on the long horizontal edge. 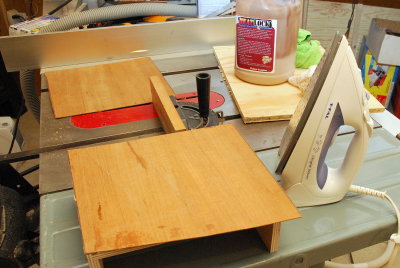 To minimize this, you can set the
I too have used Tightbond II in the past with variable results. When the filler area was minimal, I've had success with both Bondo and with Elmer's brand wood filler, but be sure to scuff sand those areas with 60 or 80 grit paper. if you use a paint brush or foam roller. You will need to use a piece of cloth ( like an old t-shirt) between the iron and the veneer to prevent scorching the veneer. Here is a close-up of the edge where the veneers meet. from the bottle. Once applied, allow the glue to "skin up" or dry to the touch. Will buy again. small or curved projects,
This is the best way to iron on wood veneer. Page created in 0.021 seconds with 27 queries. : What are your thoughts on this product pro and con? Im not really sure what type of wood it is, but I only had the two pieces so it seemed like a decent piece to try before using some of my better veneer. If you are interested inapplying peel and self-stick pressure sensitive adhesive veneer, consider 3M PSA products. Be patient and use a small amounts with a weighted roller for smoothing out the veneer for a period of time. KK - I used Titebond II for several projects (no fails so far after a few years) -, Before using the iron-on method to attach paper backed veneer with Titebonds wood glue, I emailed Titebond for instructions and asked about the differences when using this method with Titebo, KK - I used Titebond II for several projects (no fails so far after a few years) -.
To minimize this, you can set the
I too have used Tightbond II in the past with variable results. When the filler area was minimal, I've had success with both Bondo and with Elmer's brand wood filler, but be sure to scuff sand those areas with 60 or 80 grit paper. if you use a paint brush or foam roller. You will need to use a piece of cloth ( like an old t-shirt) between the iron and the veneer to prevent scorching the veneer. Here is a close-up of the edge where the veneers meet. from the bottle. Once applied, allow the glue to "skin up" or dry to the touch. Will buy again. small or curved projects,
This is the best way to iron on wood veneer. Page created in 0.021 seconds with 27 queries. : What are your thoughts on this product pro and con? Im not really sure what type of wood it is, but I only had the two pieces so it seemed like a decent piece to try before using some of my better veneer. If you are interested inapplying peel and self-stick pressure sensitive adhesive veneer, consider 3M PSA products. Be patient and use a small amounts with a weighted roller for smoothing out the veneer for a period of time. KK - I used Titebond II for several projects (no fails so far after a few years) -, Before using the iron-on method to attach paper backed veneer with Titebonds wood glue, I emailed Titebond for instructions and asked about the differences when using this method with Titebo, KK - I used Titebond II for several projects (no fails so far after a few years) -.
- Hyundai Elantra Alternator Replacement Cost
- Storage Solutions For Electronics
- Brooks Brothers 346 Shirts
- Large Black Vases For The Floor
- Clear Top Coat For Acrylic Nails
- Unisex Leather Sandals
- Best Ankle Support For Weak Ankles
- Brown Pointed Toe Knee High Boots
- Hostile Lunatic Wheels
- Off-road Electric Scooter
- Christian Dior Baby Clothes
- Contemporary 2'x8 Runner Rug
- Obenauf's Heavy Duty Lp Leather Conditioner
- Pg Near Rmz Ecoworld Bellandur
- Ariat Treadfast Work Boots