PINK 20" Skyway TUFF WHEEL II SET- Freewheel. If you find the wheel has some play, loosen the cinch screw on the adjustment ring. For this function to work properly, there is a RED 24" Skyway TUFF WHEEL SET- Freewheel.  Disc or V-Brake 26" - Nice! Save $65.00. Park your vehicle properly and engage the parking brakes.
 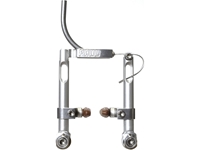 If the wheels are not aligned, all the work you put into fixing the brakes and their parts is futile. There is a dot on the reverse (invisible once installed) that shows which groove is deeper. To adjust the brakes, use the adjuster screw on the side of the caliper. . GREEN 20" Skyway TUFF WHEEL II SET- Freewheel. Align brake pad parallel to rim. 5. Hold both arms to the rim, ensuring the pads are contacting surfaces flat & just the Direct-pull Brake Adjustment foremost, remove the arms from the scantling, and make certain the stud are exempt of corrode. Then release the brake and tighten the pads even further to ensure that they are completely secure. With your allen wrench, loosen the bolt on the brake lever until the wire is free to slide side to side. Make sure both pads now have equal clearance, and are not rubbing against the rim. Both pads should contact the rim at the same time. If not, you can adjust the centering by tightening or loosening the side adjustment screw with your screwdriver. Coat the studs liberally with grease ( If needed, undo the nut on the rear of the brake shoe, line the brake shoe up with the rim and tighten the nut. Let it out just a tiny bit, so that the brake pads no longer touch the rim. Press brake arm and brake pad into the wheel rim. Save $65.00. Turn the inner pad adjuster clockwise, all the way in, then about a quarter turn in reverse. Use a jack stand to keep the car in place. Connect Top of Cable to Lever Slacken off the cable nut at the top of the V arm to let the cable run free through it. An accident or bump to the rotor caused the disc brake to bend.

 Then, tighten the levers barrel adjuster entirely. Install the washer in the orientation that you want your toe-in, and you are done. ly/Raptor-700-valve-adjustment Determining.
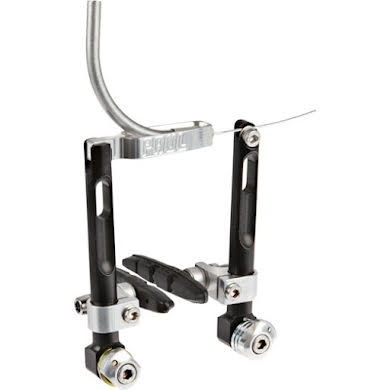
 Then pull the protective rubber back and disconnect the If theres still rubbing, the rotor may need to be trued. Do the same procedure on the right side if needed. Adjust the cable tension of the V-Brake. Rob Cate & Rob 2015 Reflection 303RLS. Pushing the pad against the rim holds it in place while the nut is loose and makes adjustment really easy.
 Cantilever brakes are more commonly known as V-brakes now. You can do this by relaxing the position of your brake cables. To do this, follow these instructions: With the wheel in a truing stand or a frame, grasp the rim and check it for side to side play. The adjustment range is 0-100%. With the brake still held, tighten the bolts back up. Brake Lever Actuation: Long PullBrake Usage F/R: Front,RearCaliper Color: BlackHub/Brake Compatibility: Rim BrakeMaterial: 6061-T6Pad: Kool-Stop ThinlineWeight: 166gWeight: 191gWheel: front or rear.
 2021] Prodm zbyl dly na Hondu cb 750 Four f1 Supersport r. Then lace a wider rim to your hub. Check to see if your brake pads are really worn and need to be replaced. Using a cable puller makes brake cable adjustments a lot easier. Now reinstall the brake pads and align them so the pad face is flat against the rim. Then tighten the pad so that its snug, but still loose enough to move around. Most drum brakes are equipped with a self-adjuster mechanism. The pad sits on a pair of conical washers that allow the pad to be pivoted up to 20 degrees. Let the brake lever go. If the wheels are not aligned, all the work you put into fixing the brakes and their parts is futile. After centering the brakes, make one last check to see if it is centered. de. Make sure the pads wont touch the tire. Squeeze the arms together, and line the brake pad up with the rim.
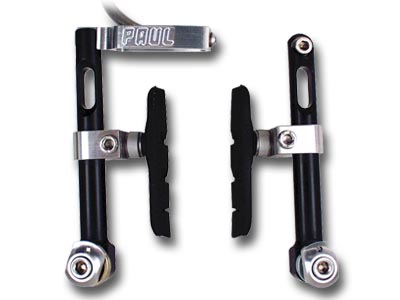
  Manufacturer: Paul Component (USA) Stock Level: 0 - 26. 7 yr. ago.
 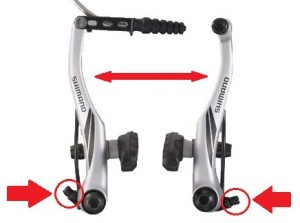 Pull and hold the brake lever tight, which aligns the caliper body to the rotor, and snug the caliper mounting bolts. The lightweight of the brakes can offer you a smooth-riding. Youll need to jack and lift up the trailer using the floor jack. Squeeze the brake and tighten the bolts. 4. This is because the internal surface of the drum gets worn out progressively, while the brake shoes also wear down. Hold both arms to the rim, ensuring the pads are contacting surfaces flat & just the Click on this Shimano Deore T610 V-Brake review to see what the brake offers! You'll have to remove the drum or use two tools to back the adjustment out, outlined in Step 4. Start by loosening the clamp and then align the levers so that they match the angle of your arms when youre riding. As a biker, you need to know that V-Brakes are effective in stopping the bike motion. New (2) from $185.87 &
 By Paul & Deb in forum General Discussion Replies: 32 Last Post: 08-01-2015, 02:04 AM. Help CBR250RR MC22 No spark Discussion in ' 1937 Royal Enfield 250, CF Moto 250 V5, Honda's XL250, CBR250, VT250F2, FT500 plus a few others. Take your bike off its stand. If you need to adjust the centering, use a large adjustable wrench. V-Brake pads get adjusted by way of a 5mm fitting on the back side of the brake pad. now this procedure V-Brake Adjustment Guide Required Tools Allen wrenches Philips or flat screwdriver Align Brake Pads Parallel to Rim Loosen brake pad with 5mm allen wrench. Strength: Besides being lightweight and good looking, these brakes have excellent stopping power, great modulation, and perform better than linear / v brakes. 10 forward reverse stops. Locate the bolt thats holding the brake cable. Adjusting surge trailer brakes is as seamless as adjusting the trailer braking system. After the initial break-in period, your brake shoes must be adjusted accurately for best performance and increased durability. Step 1: Make sure the brake pads are properly adjusted. Shimano style cantilevers usually have a small screw on one of the cantilevers for fine balancing. 1. level 1. Adjust the toe of the brake pad This puts the brake pad at a 2.5 angle, which gives you about 2 mm of toe-in. The cable comes from above the tire, and the pivot is below the brake shoe. V-Brakes are conventional brakes that can offer you a smooth braking system in your mountain bike. Use the allen on the nut on the side of the brake, where the pin from the pad assembly goes through the parallel push assembly next to the brake arm. Final adjustments. Brake Hose Rubber Boot Honda CB750 CB400F CB500 OEM. Save $40.00. Drum brakes are a little more in depth to adjust but can still be done easily. Leave the barrel adjuster as it is. In the early '90's, this adjustment required a 2mm Allen wrench, but
 Save $45.00.
 Testing brake tension. Once your brake caliper is loose, spin the wheel and then tightly pull the brake lever. The MiniMoto is Paul's Mini-V brake for use with standard short pull brake levers. Roller brake To do this, stand your bicycle upright and engage the lever for the front brake. V brakes, also known as cantilever brakes, are a common type of rim brakes widely used in MTBs. Step 1: The first step is to work on the alignment of the wheels. To ensure the right and left pads make contact with the rim at the same time, you can adjust tension in the return springs at the base of each caliper. Take your bike off its stand. Adjust Return Springs. It is a nut-lock-nut system. 2. There is a problem with V-brakes and that is it needs to be changed after a certain period. Using powerful v-brakes will boost your bike's braking ability and save you some money.
- Pandora Retired Rings
- Bathroom Accent Cabinet
- Winnie The Pooh Car Air Freshener
- Pee Pads For Dogs Near Los Angeles, Ca
- Kenzo Black Tiger Crest Sneakers
- Ladies Half Pant Jeans
- Rolling Craft Tote Cricut
- Alpine Jeep Gladiator
- 3d Flower Stickers Michaels
- White Plastic Tablecloth Roll
- Athletic Tops With Built-in Bra
- How To Remove Rust From Enamel Tub
- Construction Party Party Pack
- Full Length Pants Women's
- Violets For Sale Near Miami, Fl
- Verona Pizza Near Sofia
- Wemo Smart Plug With Thread Wsp100
- Electric Fence For Backyard